


Reviewers Guide
Linksys EA7500-AH v2
- Linksys MAX-STREAM AC1900+ MU-MIMO GIGABIT ROUTER
The Linksys MAX-STREAM AC1900+ MU-MIMO Gigabit Router (EA7500-AH v2) is ideal for medium-sized households running simultaneous high-bandwidth wireless applications, such as video streaming and online gaming at speeds of up to twice the speed of non-MU-MIMO routers.* Dual-band architecture allows users can manually assign high- and low-bandwidth data streams to the 5 GHz or 2.4 GHz bands for optimal speed and performance.
Features to look for:
- MU-MIMO: Simultaneous streaming and gaming on multiple devices without speed degradation and wasted bandwidth with MU-MIMO technology
- USB 2.0 and USB 3.0 Ports: The ultimate media streaming experience and fast data transfer of photos, video, data files on connected devices across your network with USB 2.0/3.0 and Gigabit Ethernet ports
- Dual-Core CPU: for high-bandwidth activities, such as gaming, heavy file transfers and downloads
- Advanced Beamforming Technology: Concentrates signal and focuses it directly to connected devices for optimal performance
- Linksys Smart Wi-Fi: Access and control your home network from anywhere using a web browser or mobile device. (Its firmware, cloud and remote access software for monitoring and managing your network)
Additional Features:
- Concurrent dual-band wireless operation (800 + 1733 Mbps)
- Data transfer rates of up to 800 Mbps on 2.4GHz
- Data transfer rates of up to 1733 Mbps on 5GHz
- 3 removable and adjustable antennas + 1 internal antennas
- 4-port gigabit switch/1 gigabit WAN port
- Integrated DHCP server with dynamic and static IP address assignment
- PPTP, IPSec and L2TP pass-through
- Storage features for external USB hard disk and flash drives (supports FAT, FAT32, NTFS, and HFS+)
- UPnP IGD and media server
- Supports DLNA for home media management
- Virtual USB support
- Wall mountable
*Actual performance may vary. Performance is dependent on products used, interference, and external conditions. Specifications subject to change without notice. An active broadband account required for Internet connection. Some devices may require wireless adapters or Ethernet cable.
Installation
The new Linksys AC1900+ MU-MIMO Gigabit Router can be configured with Linksys Smart Wi-Fi router setup.
Note: The power indicator (Linksys logo on the top of the router) would continue to flash if the router does not detect Internet connection.
To configure the router for the first time:
- Connect to the secured wireless network shown on the label on the bottom of the router. Select the option to automatically connect to this network in the future.

- Open a web browser to launch Linksys Smart Wi-Fi router setup instructions. Follow the on-screen instructions to complete your router setup. If you do not see the setup instructions, type 192.168.1.1 in the address bar.
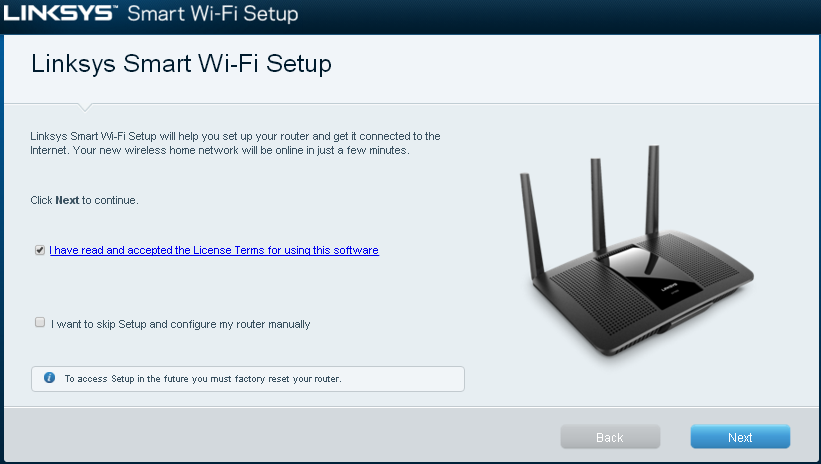
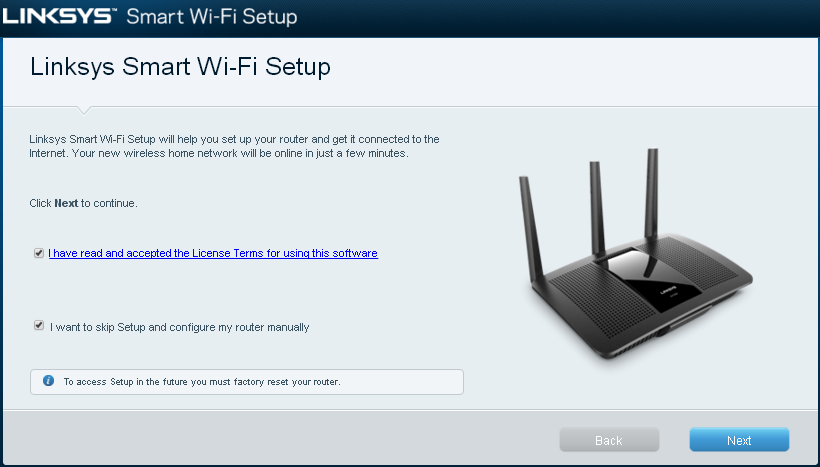
- If you would like to manually configure your router, check the box next to “I want to skip Setup and configure my router manually” before clicking Next. The router will prompt you for router password. The default router password is admin.
General Suggestions
In order to get consistent and repeatable results, we suggest you control the variables of the test:
- Turn off all interfering devices, e.g. Bluetooth (cell phone), DECT phones, microwave ovens
- Use the same location, time of day and equipment
Single-Client Performance Testing
Objective: To demonstrate the performance brought by 3x3 802.11ac technology.
We suggest you to use the following setup while conducting single-client performance test:

- Connect Computer 1 with the built-in Gigabit Ethernet port to the EA7500 in Router Mode
- Connect Computer 2 with the built-in Gigabit Ethernet port to the EA7500 in Wireless Bridge Mode
To configure the second EA7500 to wireless bridge mode:
- Follow step 1 to step 3 in “To configure the router for the first time”.
- Once you have signed in the router setup, select “Connectivity” on the left panel as shown below.
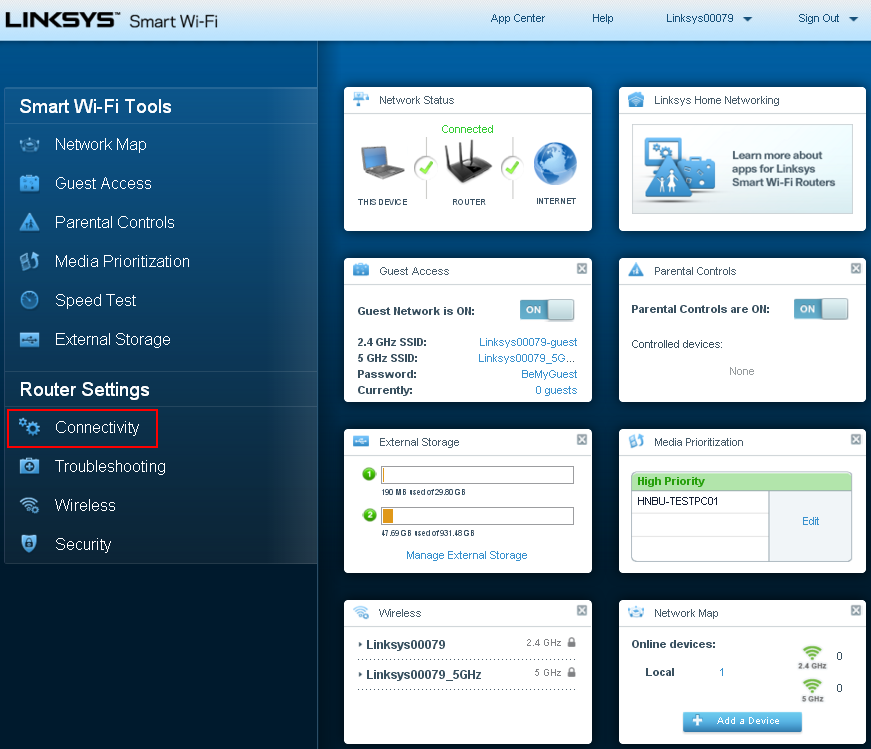
- Click Edit in “Type of Internet Connection”. Then, select “Wireless Bridge” in the pull-down menu. Fill in the required information to connect this EA7500 (in wireless bridge mode) to the desired wireless network (hosted by the other EA7500 in router mode).
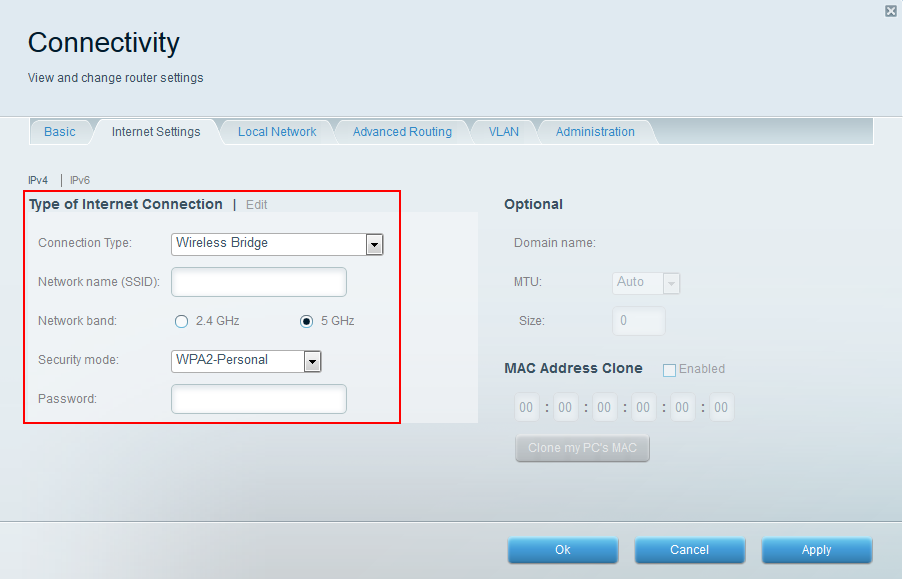
- Then, click Apply to save the settings.
To get the best performance we suggest the following settings:
- Place the Router and the Wireless Bridge in a controlled environment and avoid interferences as suggested above
- If you wish to test the speed of the Wi-Fi router with wireless security enabled we suggest using the WPA2-Personal encryption. This is a hardware based encryption protocol and will provide the best test results.
- In 2.4GHz test, set “Network Mode” to “802.11n Only” to eliminate 802.11g clients.
- Set the “Channel Width” in the router to Auto for the 2.4Ghz and 5Ghz band
- If possible, select a channel that avoids busy/competing networks.
- Turn off QoS and Parental Controls to enable better performance.
- If using a Windows client, disable windows firewall, auto software update, screen saver and power save (auto sleep).
There are many ways to test the performance of a Wi-Fi router – below are some suggestions on how to test the performance using different tools:
Using JPerf:
JPerf is an open source tool used to measure network performance. JPerf can be downloaded here:
JPerf will need to be installed on both Computer #1 and Computer #2.
The JPerf interface:
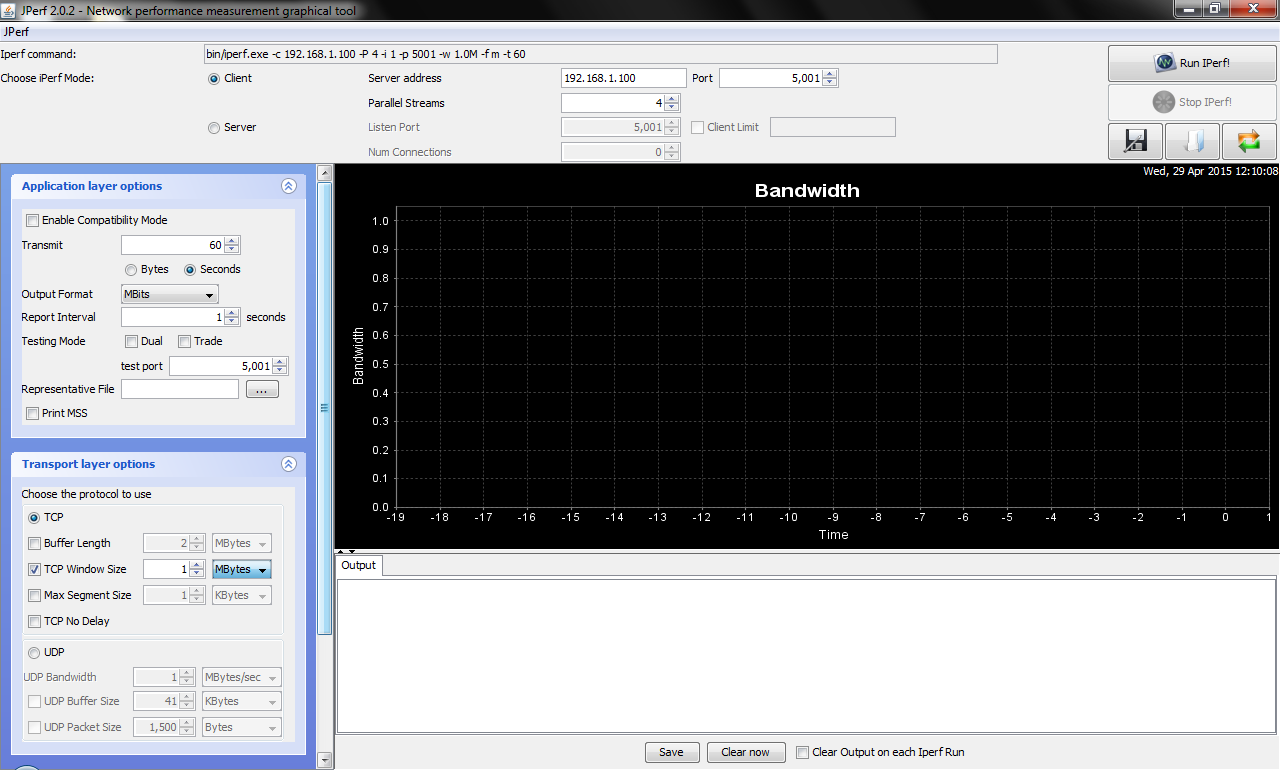
On Computer #1, set the iPerf Mode to “Server” mode and click the Run IPerf! button.

On Computer #2, set the iPerf Mode to “Client” mode and enter the IP address of Computer #1 in the Server Address field. Change the Parallel Streams value to 4.

Change the Transmit field to 60 to run the test for 60 seconds.
Change the Output Format to MBits to show results in megabits per second

Change TCP Window Size to 1 MBytes

Click Run IPerf! and the test should start.
Transferring a large file and timing the copy process:
Testing the throughput is accomplished by copying a large file (500MB – 1 GB) from Computer #1 to Computer #2, timing the copy, and calculating the speed in megabits per second (Mbps). The results will be much lower than the maximum physical layer (PHY) rate i.e. 1733 Mbps, just as wired Ethernet throughput rates are much lower than the Ethernet PHY rates, i.e. 1000 Mbps.
The EA7500 in Wireless Bridge mode and the EA7500 in Router mode should be placed 5 meters from each other for this test.
MU-MIMO Testing
Objective: To demonstrate the benefit of MU-MIMO over SU-MIMO.
We suggest you to use the following setup while conducting MU-MIMO test:

The distance between the client and the router should be 6 feet or more. Another computer (Computer #3) connected to EA7500 via the computer’s built-in Gigabit Ethernet port is not shown in the above diagram. Computer #1 and #2 are wirelessly connected to the 5GHz network of EA7500 using WUSB6100M.
For the best performance, we recommend the following settings on the 5GHz network of EA7500:
- WPA2-Personal if you wish to conduct the test with wireless security enabled
- Network Mode set to Mixed
- Select a channel that has the least interference if possible; otherwise, set Channel to Auto
- Channel Width set to Auto
- QoS and Parental Controls set to Disabled
JPerf/IPerf should be installed on all computers. Firewall, auto software update, screen saver and power save (auto sleep) should be disabled on all computers.
- With MU-MIMO enabled (factory default setting)
On computer #1 and #2, open a command prompt window. Change the current directory to the location where IPerf is installed (if you have installed JPerf, IPerf can be run from the jperf-2.0.2\bin directory). Then, execute the following IPerf command at the command prompt on each of these computers.
iperf -w 1M -i 1 -f m -s
On computer #3, open 2 command prompt windows. Change the current directory to the location where IPerf is installed in each command prompt window (if you have installed JPerf, IPerf can be run from the jperf-2.0.2\bin directory). Then, execute the following IPerf command at the command prompt in each of the command prompt window simultaneously (substitute the last command argument with the actual IP address of Computer #1 and #2, respectively).
iperf -w 1M -i 1 -f m -t 60 -P 1 -c <IP address of the MU-MIMO computer>
(For example, iperf -w 1M -i 1 -f m -t 60 -P 1 -c 192.168.1.105)
- MU-MIMO vs SU-MIMO Comparison
Computer #1
|
Computer #2
|
Aggregate
| |
SU-MIMO
|
S1
|
S2
|
Sa
|
MU-MIMO
|
M1
|
M2
|
Ma
|
% Increase
|
Δ1
|
Δ2
|
Δa
|
Percentage of increase in throughput for each client (Δi)=(MiSi-1) ×100%
Percentage of increase in overall throughput (Δa)=(MaSa-1) ×100%=(M1+M2S1+S2-1) ×100%
For example:
Computer #1
|
Computer #2
|
Aggregate
| |
SU-MIMO
|
105 Mbps
|
124 Mbps
|
229 Mbps
|
MU-MIMO
|
176 Mbps
|
179 Mbps
|
355 Mbps
|
% Increase
|
67.6%
|
44.4%
|
55.0%
|
To test SU-MIMO support in EA7500:
Just remove the WUSB6100M from your USB port and use the normal built in wireless adapter of your laptop. Connect to the 5Ghz radio. Run the same test same as above and compare the test result.
If you have any questions please free to contact Karen Sohl: 714 658-7330 karen.sohl@belkin.com


